Code signing is a vital security feature that ensures the integrity of an application. For Mac OS applications, it provides a mechanism for users to trust that the application they are installing has not been tampered with and is, indeed, from a verified source. This blog post will explore three crucial aspects of the Mac OS App code signing procedure: the role of the Apple Developer Program, the process of creating a signing certificate, and the actual code signing process.
Apple Developer Program
The first step in the Mac OS application code signing procedure is to enroll in the Apple Developer Program. This program provides developers with the resources needed to develop and distribute apps on the Apple platform, including access to beta software, advanced app capabilities, extensive beta testing tools, and app analytics. More importantly, it gives developers access to certificates, identifiers and profiles, which are essential in the code signing process.
Creating a Signing Certificate
The second step in the procedure is creating a signing certificate. After enrolling in the Apple Developer Program, developers need to generate a certificate to sign their app. This is done through the Certificates, Identifiers & Profiles section of the Apple Developer website. Developers can create a certificate request on their Mac, upload it to the website, and then download the resulting signing certificate. This certificate, when combined with the developer’s private key, creates a unique digital signature that is embedded in the app during the code signing process.
1. Steps to Create a New Certificate Signing Request (CSR File):
- For this open Keychain Access in your mac
-
Do as below:
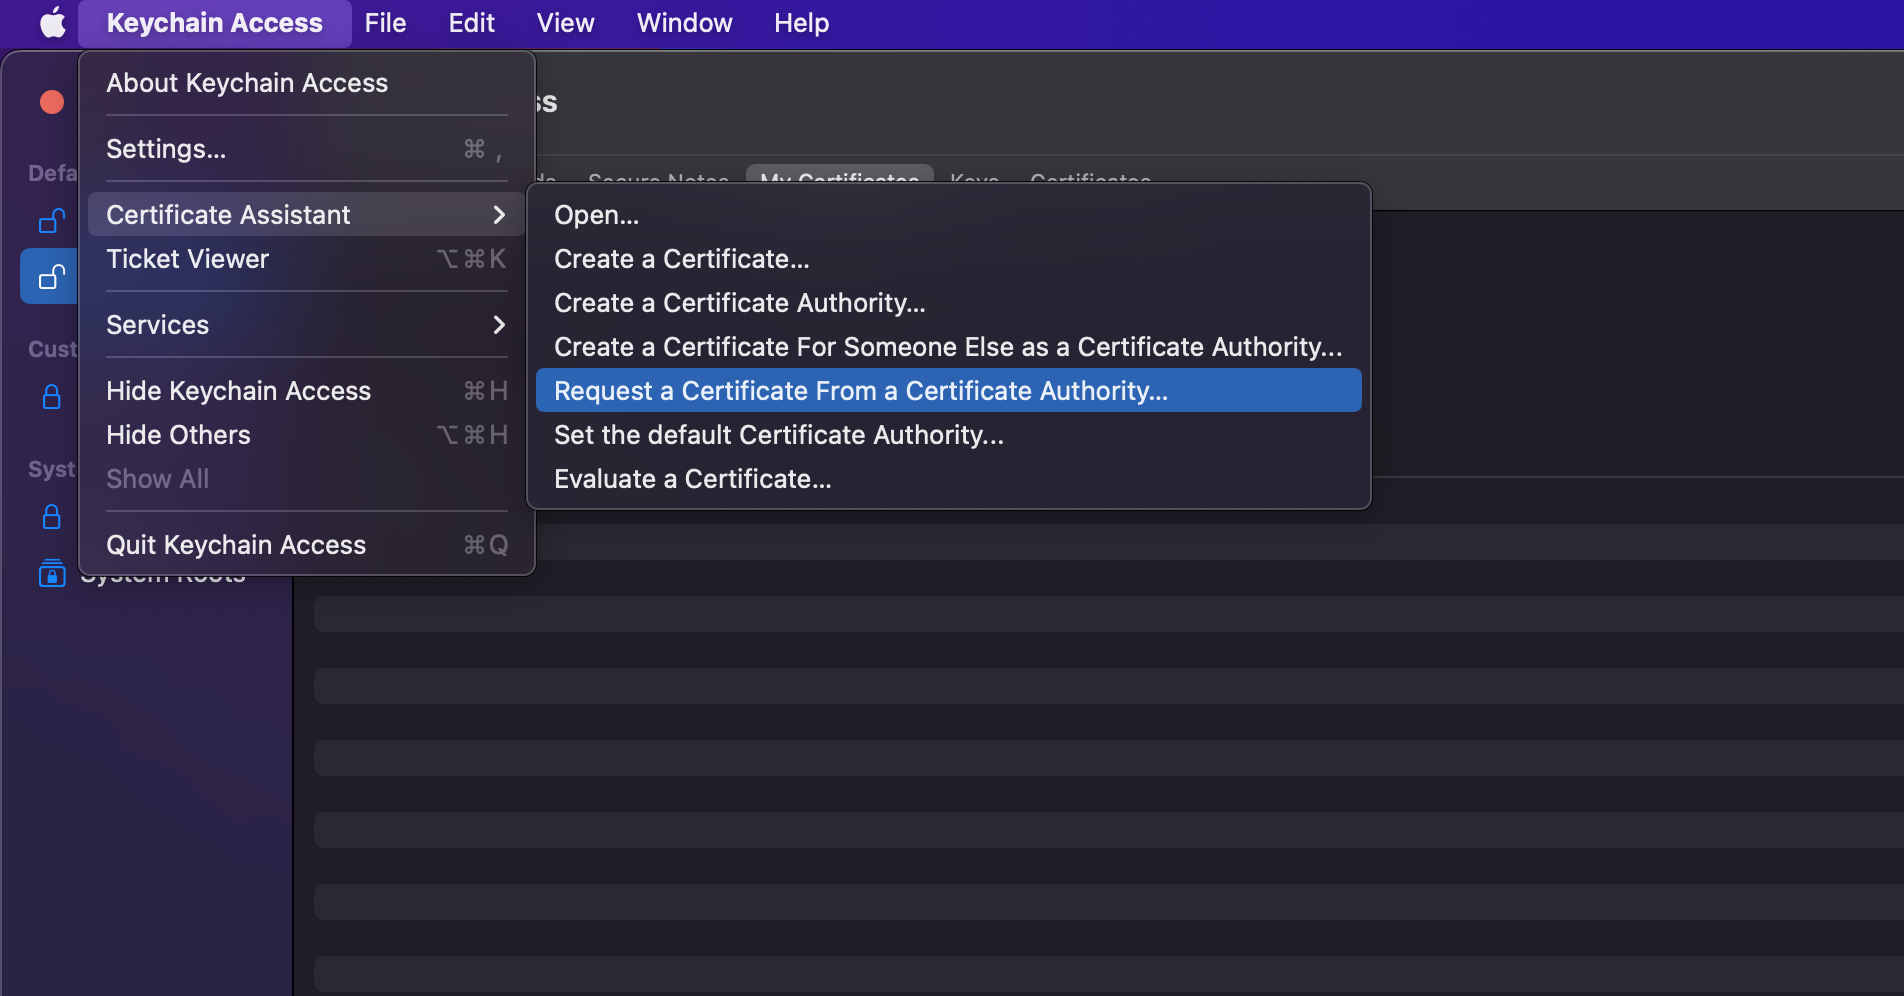
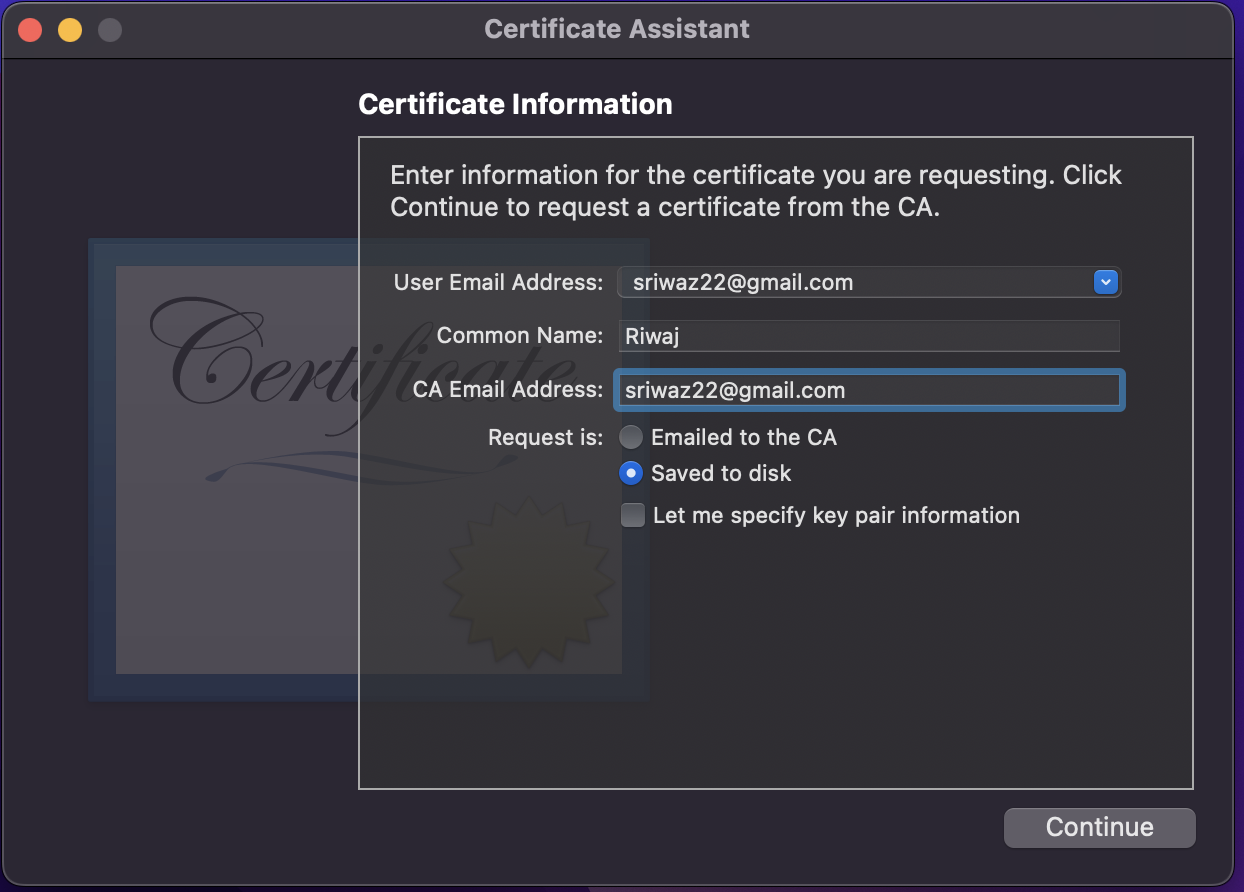
Make sure you save it on a disk
2. Steps to create the Distribution and Development Certificate & P12 file:
- Go to this link and log in: https://developer.apple.com/account/resources/certificates/add
-
Generate certificates for Apple development, Mac development, and Mac app distribution.
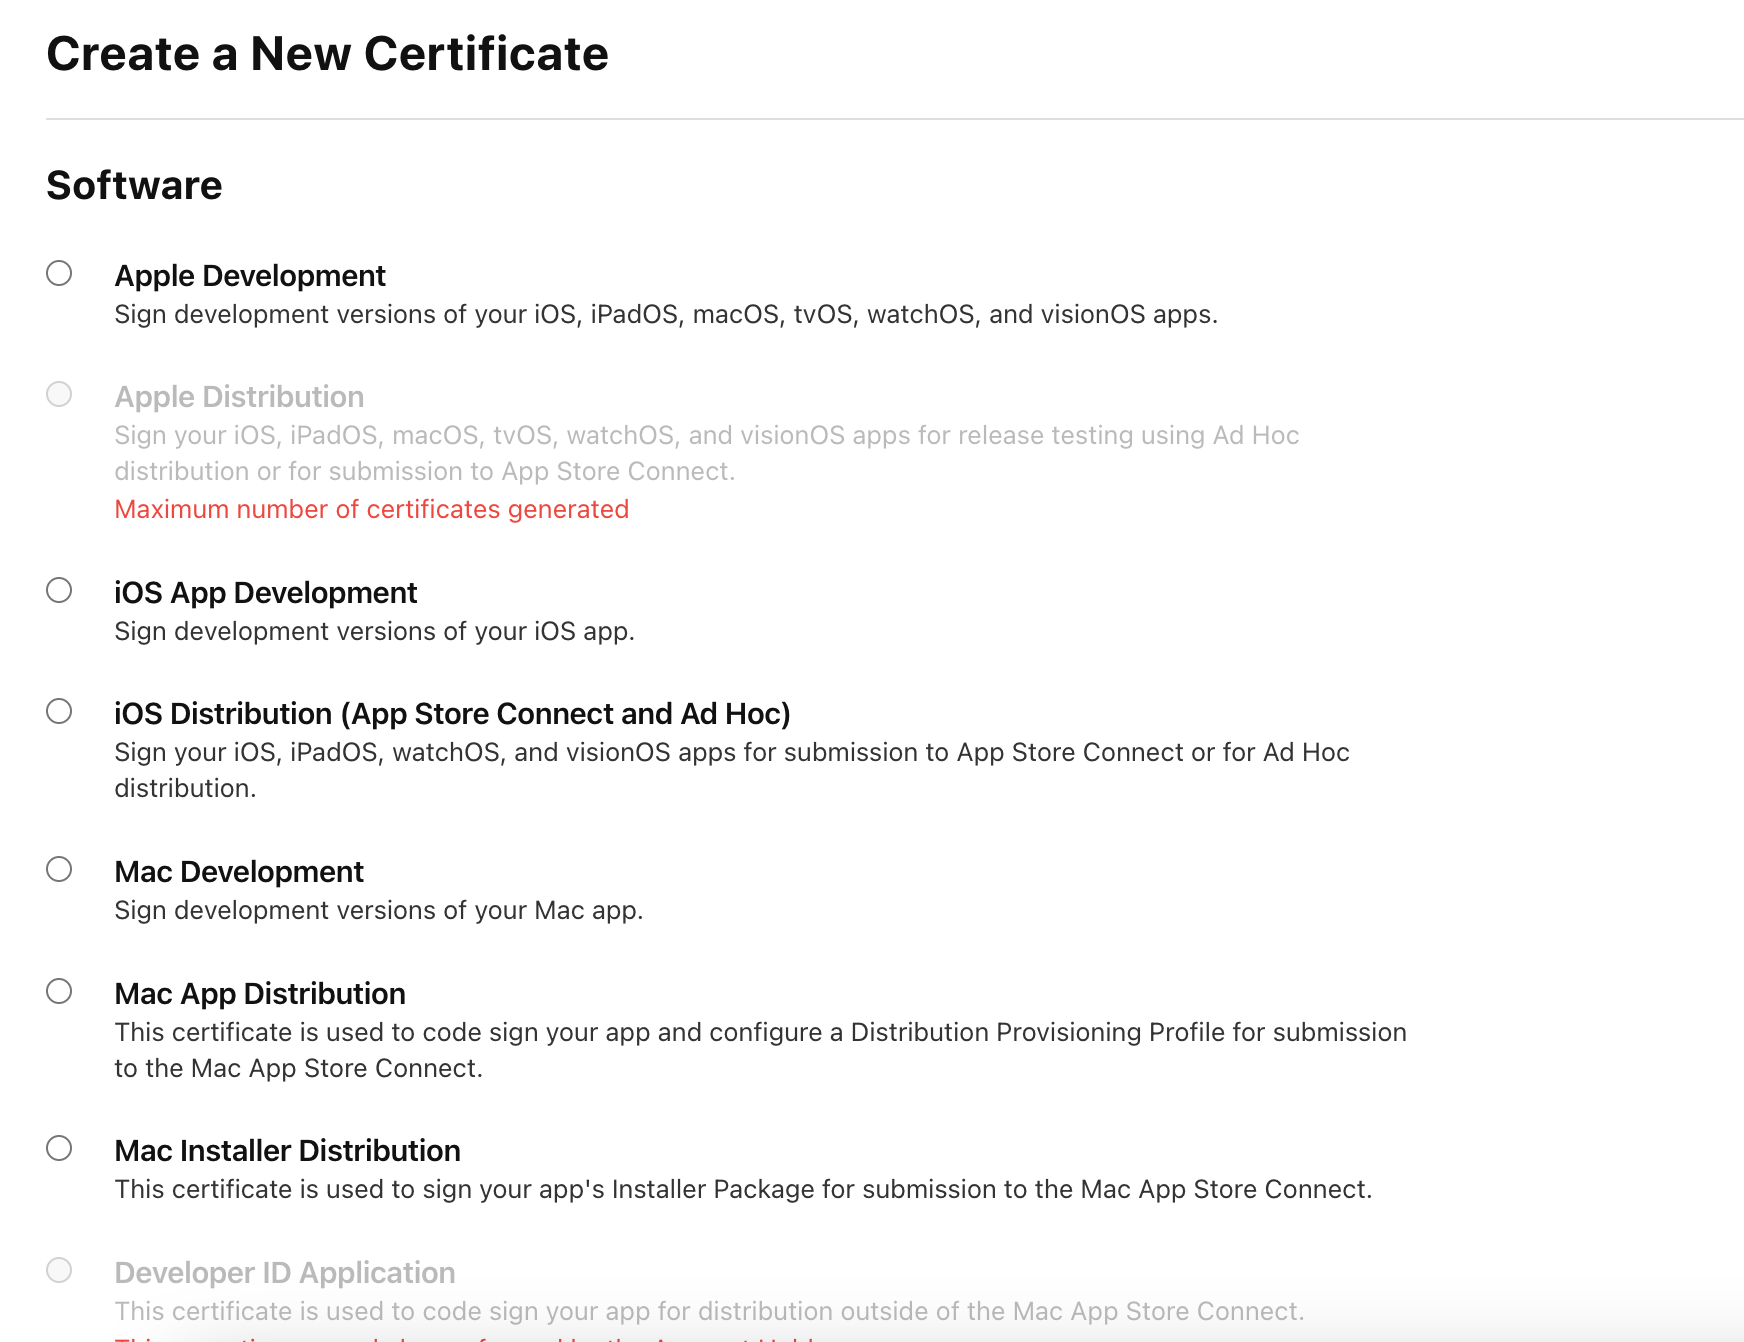
- Now continue with certificate creation using the CSR that you have previously created using keychain access.
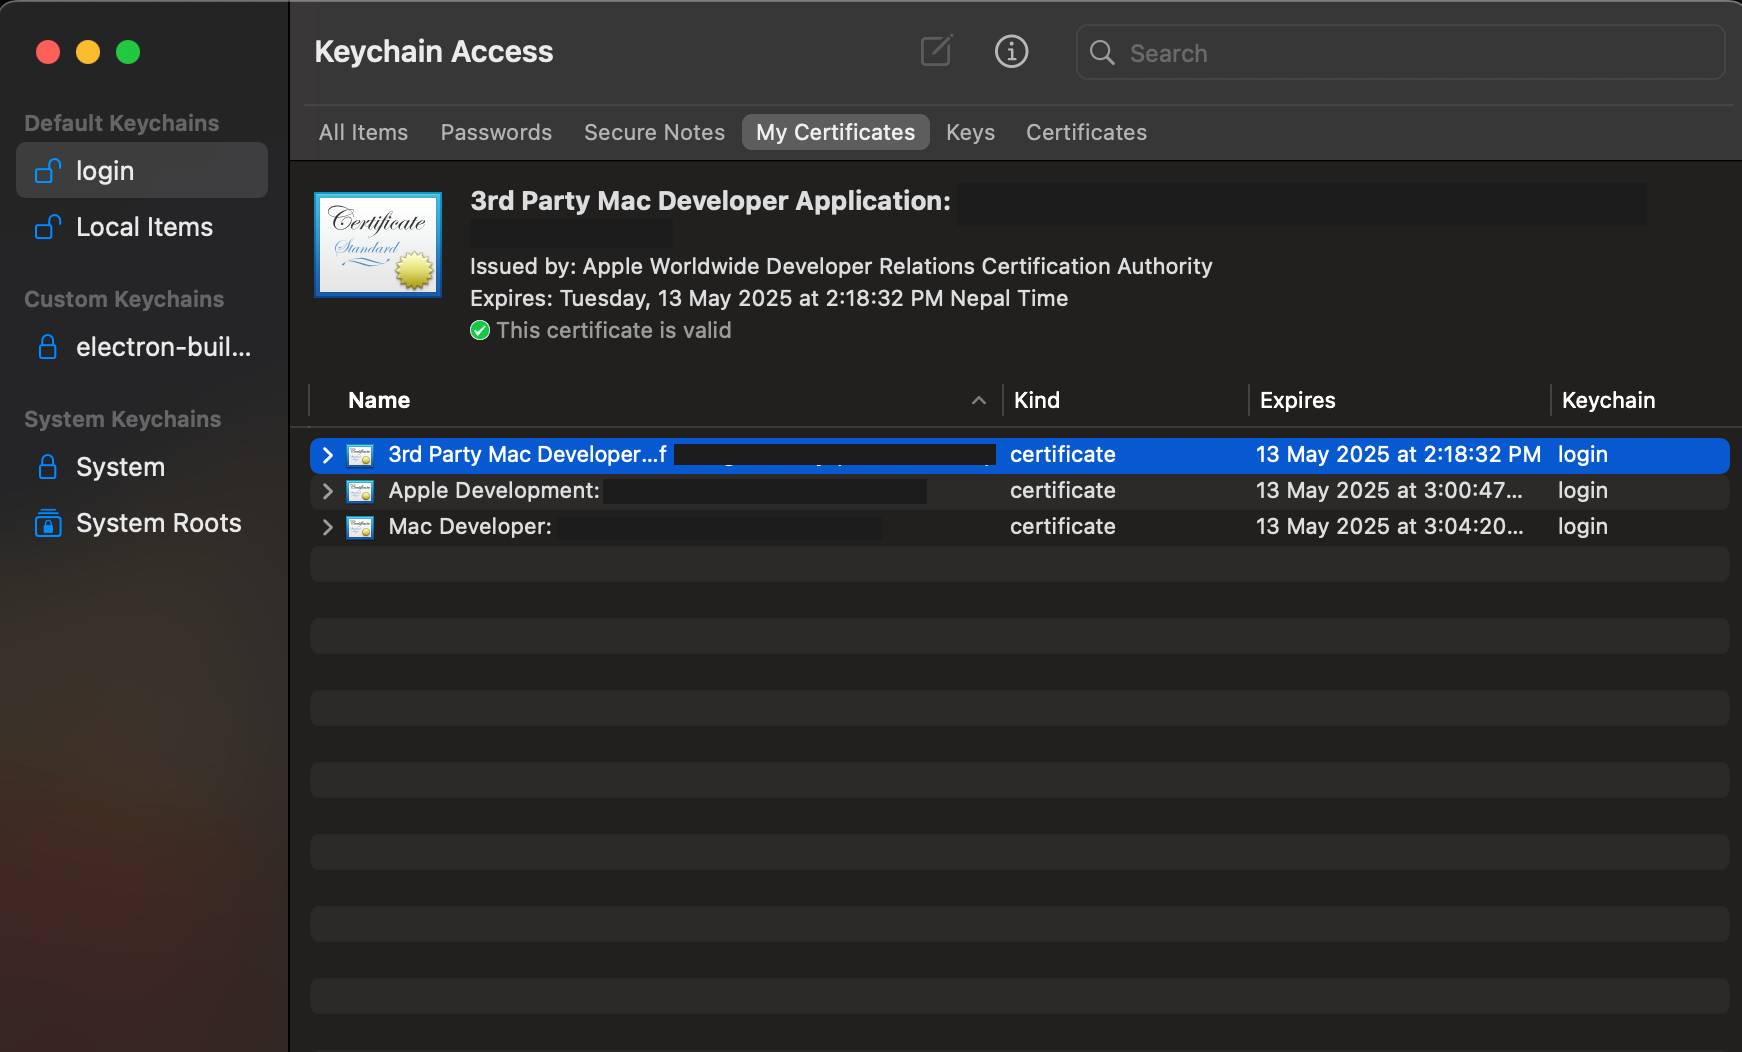
- You have created a new distribution certificate. Do download it.
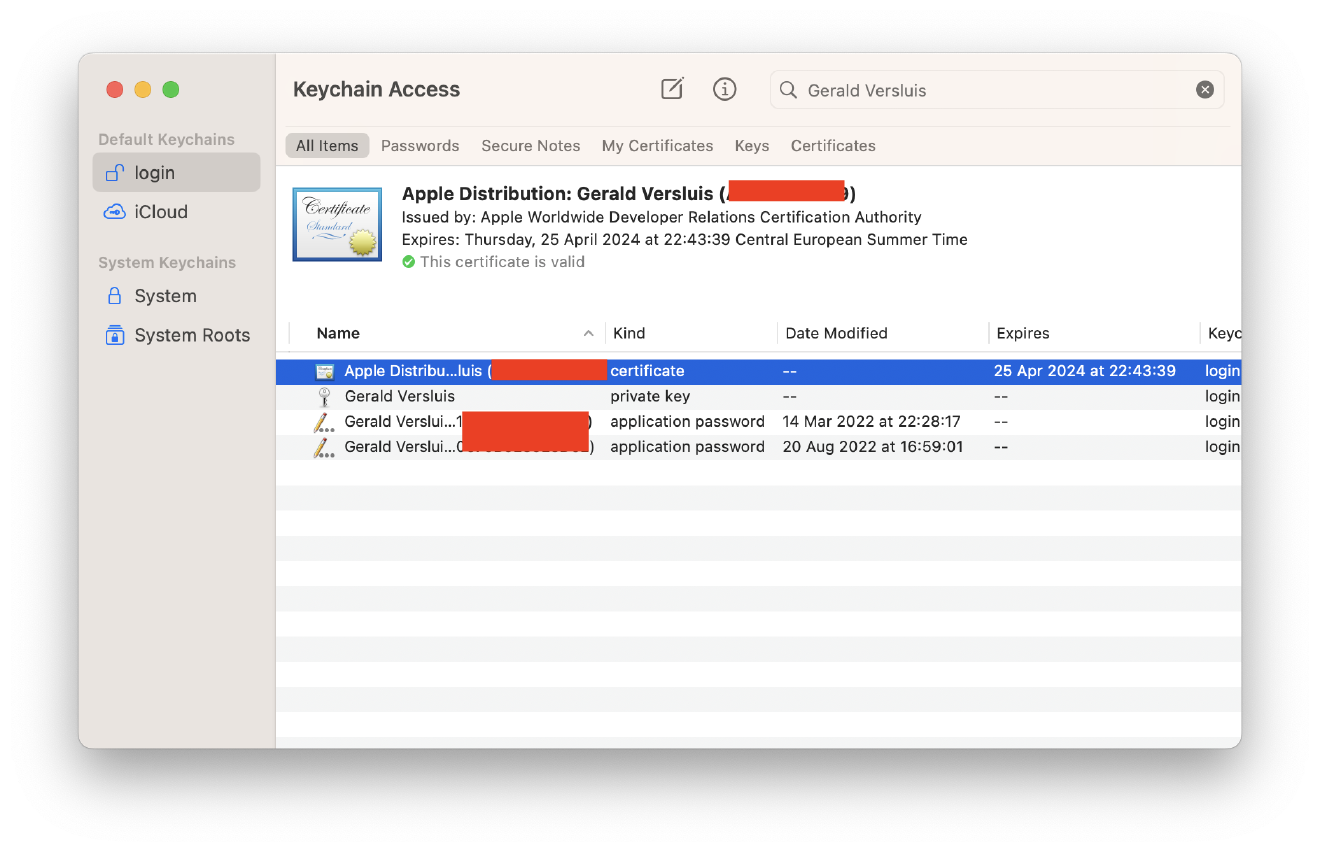
- If you have already created and downloaded the certificate. Double-click it and install it. It will now be available in your key chain.
-
They will appear like this:
- If the certificates show invalid, you can follow the steps in this link: https://blog.verslu.is/app-publishing/unable-to-build-chain-for-self-signed-root/
- This blog says to go to this website (https://www.apple.com/certificateauthority/) and download the
Worldwide Developer Relations - GXcertificate (replace GX with other versions like G1, G2, G3, and so on). You may need to download multiple certificates, install them, and check if the certificates become valid or not. -
The next step is to select all certificates and private keys, right-click, and export them:
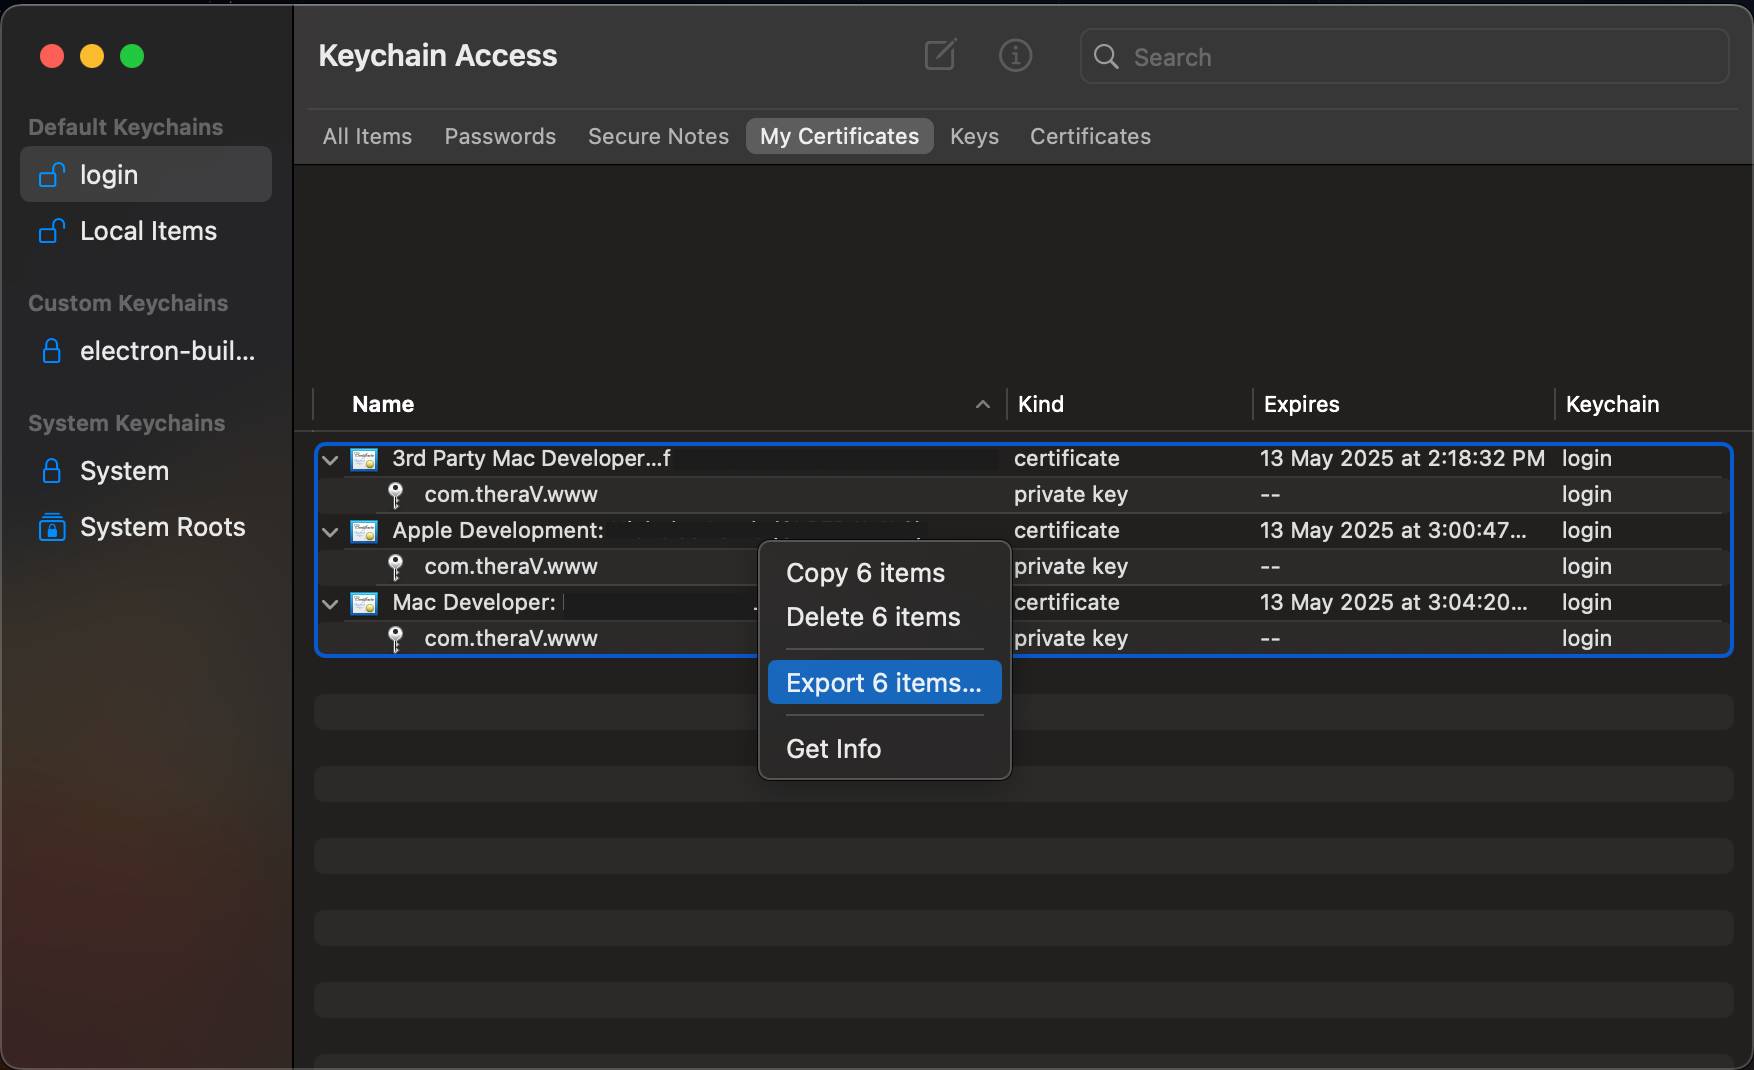
-
Now Generate the P12 file in the next step:
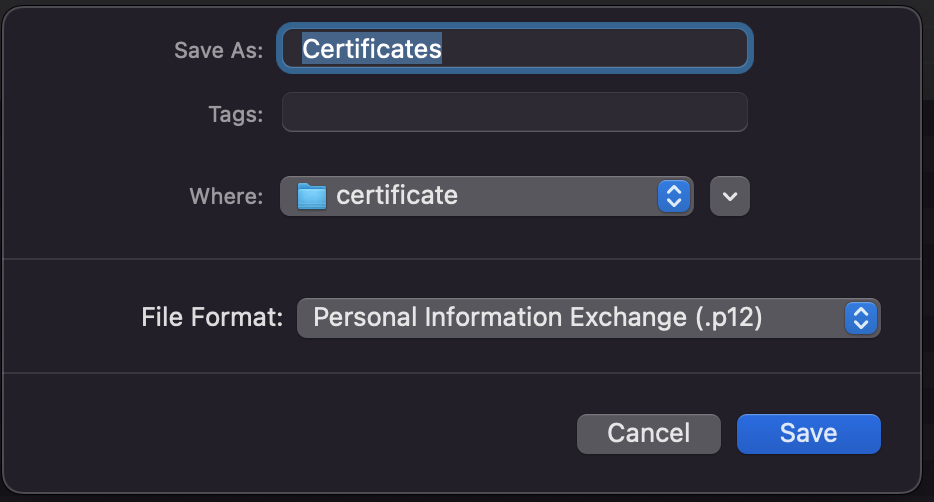
-
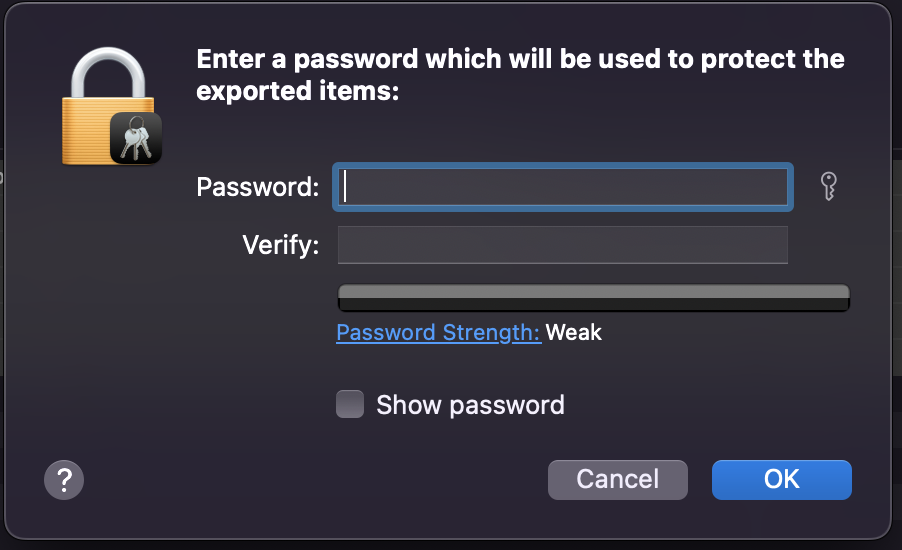
Give any password to the p12 file, I gave “Github,” and also in the next step, make sure to click, Always Allow.
- Next is the code signing process using this P12 file or certificate.
Code Signing Process Using Electron-Builder
The final step is the actual code-signing process. (https://www.electron.build/code-signing)
- Run this command in the terminal:
export CSC_LINK=/Path/To/P12File.p12. Set the path to the p12 file based on your path. - Run this to set the password for the P12 file:
export CSC_KEY_PASSWORD=xxxxxx. Replace xxxxxx with the password that you set while exporting the p12 file - Now, Run the command to generate a build using electron-builder. Electron-builder will automatically code-sign your app.
Additional Configuration for Mac Build
- under “build,” add these properties in package.json
"mac": {
"target": "dmg",
"icon": "build/icon.icns",
"category": "public.app-category.utilities",
"hardenedRuntime": true,
"gatekeeperAssess": false,
"entitlements": "build/entitlements.mac.plist",
"extendInfo": {
	"NSMicrophoneUsageDescription": "Thera-v need access to your microphone for audio input during video conferencing.",
	"NSCameraUsageDescription": "Thera-v need access to your camera for video conferencing.",
	"com.apple.security.device.audio-input": true,
	"com.apple.security.device.camera": true
	 }
}
- Create
entitlements.mc.plistfile inside your project and add the following properties if you want access camera and mic (https://github.com/electron/electron/issues/17640)
<?xml version="1.0" encoding="UTF-8"?>
<!DOCTYPE plist PUBLIC "-//Apple//DTD PLIST 1.0//EN" "http://www.apple.com/DTDs/PropertyList-1.0.dtd">
<plist version="1.0">
  <dict>
    <key>com.apple.security.cs.allow-jit</key>
    <true/>
    <key>com.apple.security.cs.allow-unsigned-executable-memory</key>
    <true/>
    <key>com.apple.security.cs.allow-dyld-environment-variables</key>
    <true/>
    <key>com.apple.security.device.microphone</key>
    <true/>
    <key>com.apple.security.device.audio-input</key>
    <true/>
    <key>com.apple.security.device.camera</key>
    <true/>
  </dict>
</plist>
- Now, run the command to generate your Mac app build which will be code-signed.
Conclusion
Understanding the Mac OS App code signing procedure is critical for developers looking to distribute their applications on the Apple platform. It not only ensures the integrity and trustworthiness of an app but also provides a level of assurance to end-users about the application’s source and safety. By familiarizing themselves with the Apple Developer Program, the process of creating a signing certificate, and the actual code signing process, developers can ensure a smooth and successful app distribution process.